

von Fredrik Billig, Stockholm Schweden Original öffnen
Welcome to my Marblehead-project site.
Here i will share my experience of building a Marblehead from a drawing by Graham Bantock.
It's the second Marblehead i build on my own. The first one was a Wafer built in 1994.
All the rigs and radio equipment was ok, so i only needed a new hull to get up to date with the faster boats.{mosimage}
The drawing and the plug.
I ordered the drawing from Sails Etc in the middle of februari and recieved it about a week later.
It cost me 15 GBP. It's a two part drawing with full scale details of almost everything, down to how to a detailed description of how to make make your own booms and even sails.
Since i already got a quite competitive Marblehead i'm only interested in the hull and will keep my rigs and fin from that boat. More about my current boat later.
Sails Etc describes the Monarch with these words:
"A close sister to ROK and PRIME NUMBER. A new Marine Modelling plan with a good deal of construction information. Needs to be built light for best performance. SAILSetc foils, fin box/mast tube, and deck mouldings can be used to complete a planked hull. Build it with the raised foredeck if you plan to use shroudless conventional rigs or with a flat deck if you plan to use swing rigs only".
 My rigs are a mix of conventional Walicki rigs and swing rigs from Sails Etc so i will use a fin box cut for the Astra (i bought the Astra drawing and fin box last year, but never had the time to build the boat).
You can build it with a planked hull as Sails Etc descibes it, but i prefer moulding it in epoxy and carbon fiber. I built my current boat that way, but i didn't make the plug that time.
So, that's going to be a first for me, for a Marblehead atleast. This is probably the tenth model boat i will build.
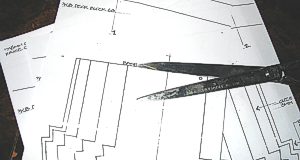
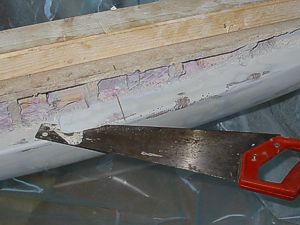
 After photocopying the drawing i cut out all the sections and glued them on wood-chipboard and carefully used a saw and a file to make the sections as much like the drawing as possible.......
Now, there are atleast two different ways of completing the plug. Either you make a planked "hull" and mould the boat around that. Or you can put plastic foam between the sections and shape it as good as possible, then mould it with fibreglass cloth and use filler and sandpaper to make a nice finish, then mould the boat around that. I have never built a planked hull so i went for the second choice, wich i believe is also quicker. Not so sofisticated since you probably will need some amount of filler.
But, the plug will never sail, it's just the shape and finish that has to be right.
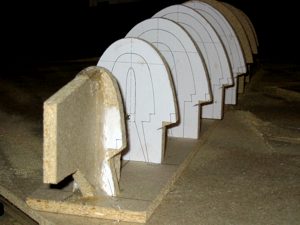
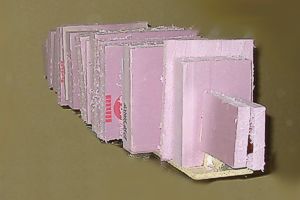 From left to right in about one hour.
I used a saw, a rasp, sandpaper and my eyes to get it right. If it isn't right, well, filler in large quantities will come later...
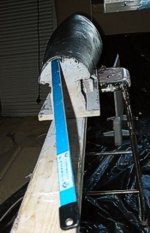
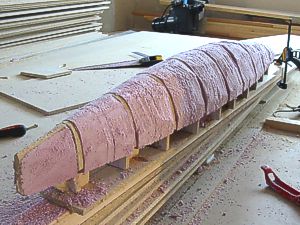 To make a stable platform for the plug i screwed it on a plank about one meter longer than the boat. In the picture to the right you can see the whole thing being held down by a clamp.
Next step was to cover my plasticfoam and chipboard Marblehead with three layers of 300gr fibreglass cloth and epoxy.
The plastic foam i used will melt if exposed to the much cheaper polyester-plastic or usual plastic padding filler. So epoxy was the only alternative.
There are plastic foam types that's suited for polyester. But they are so much more expensive than this type made for isolation that the cheaper polyester doesn't make up for it.
undefined
Finishing the plug
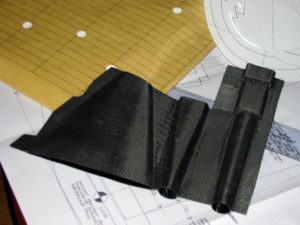
What material is the plug made of you may ask. Well, a not so small part of it is made out of the material to the right --->.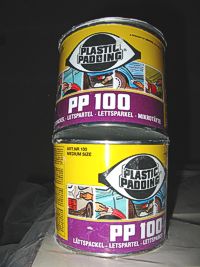 As seen in part 1, i made the "raw" plug quite quickly in a not so sofisticated way. But i still want a good finish to the hull and therefore have to be quite careful with the rest of the work with the plug to get an accurate result.
This part took about a month, mainy because i have to keep the girls (9 and 32 years old) happy and try to finish the upperfloor in our house. It was'nt decorated when we moved in four years ago, but this summer it will be finished. The last month the walls has started to come up and the girls are starting to look for wallpaper. Of the expensive kind mainly. Back to the boatbuilding now..
 Maybe i should have been more careful with the sections, especially those in the middle of the boat. It didnt look right there, so i had to redo that part a few times before i was satisfied.
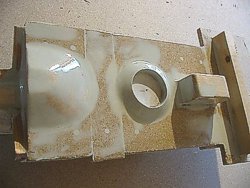
When i mould the hull, i will make a flange to attach the deck to.
With the raised foredeck, the flange has to be at an angle on the forward part of the boat. I missed the point where that angled part should start and the flange vertical part will end with about ten centimeters (thats 4 inches for you poor non-metric still out there :-). Part of the cure is seen to the right.
 Another small mistake linked with the flange is that i made it too narrow. You can se the traces of the widening of the flange on the picture below to the right.
 <-- To finish of the finish,
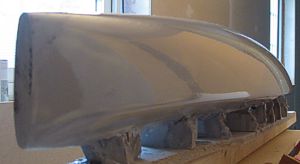
two layers of sprayfiller was sprayed on the plug. Fine sandpaper made the surface smooth as silk
To get a hard surface on the plug i coated it with garage-floor varnish -->.
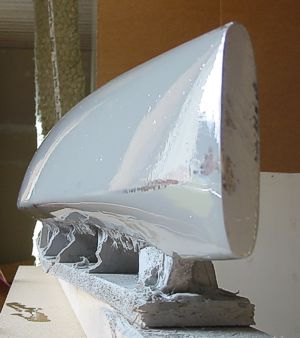 Why not coat ot with epoxy? Well i have used this technique a few times for plugs and smaller mouldings. It works very well. It's easy to get a good shiny finish with it and after waxing it the moulded hull is very easy to separate from the plug. It's a one-component varnish mainly used for floors with high strength. Extremely quick to work with and the result is very shiny (i have used it to varnish persimmon golfclubs too, that was before they invented "metal woods").
I varnished the boat i am saling right now, SWE 91, with floor varnish almost ten years ago. It's still in perfect condition.
Moulding the hull
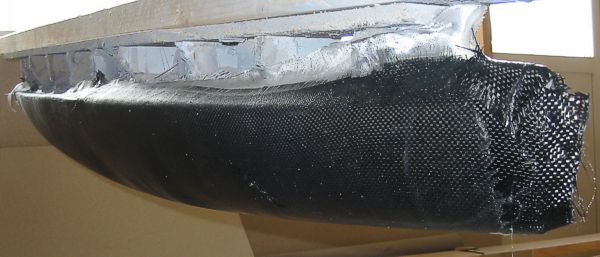
Time to mould the hull with epoxy, carbon fiber and glass cloth. Well i did it twice actually. The first time i used to little epoxy in the outer layer, wich gave a lot of small holes (pores) that had to be sealed. I tried with various things but wasn't satisfied, so i did it again. This time it's much better.
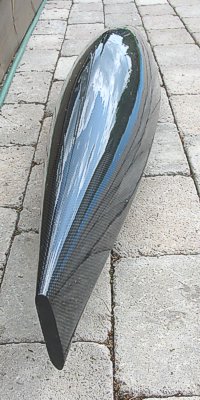
 I bought the carbonfiber cloth from Sails etc since i didn't know of any swedish company selling carbon fiber cloth at a reasonable price. I do now (its on SRSS links page). The hull is moulded with one layer of 200gr carbon cloth and one outer layer of 100gr glass cloth. That layer will mainly be there to keep the carbon cloth in place while curing and make sure there are no pores in the carbon cloth that will make the hull leak. Well it will leak anyway if you do as i did the first time :-/. The outer glass layer will almost entirely be sanded away and the end result will look loke pure carbon fibre (finished of with floor varnish offcourse :).
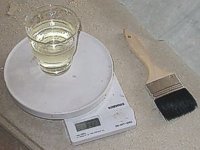 To get the epoxy right i always use a a digital scale. By measuring the two parts to the gram it always cures like it should.
 To make the hull to easily separate from the plug i waxed it thoroughly and used polyvinylalcohol (release agent). No problems in getting the hull too loosen, but a little help with an old dinghy batten made it even easier.
The order of work when moulding is something like this:
1. Cut the cloths in roughly the right sizes. You don't want to use the scissors to much when your hands are full of epoxy resin.
2. If you need to secure the cloth to the plug in anyway with nails or staples (you do if the cloth is so stiff that it wont bend round the flange, for example) take them out now and put them close to where you are working.
3. Mix the epoxy. Don't mix to much at the same time. It could start a chemical reaction that produces heat and the epoxy will harden to fast or even cause fire (i have been close). If you need more, make a second mixture later.
4. Lay the carbon cloth over the plug and "paint" the epoxy on the cloth. Don't paint the plug with epoxy an then lay the carbon over that. You will get an excessive amount of epoxy on the inside, and that's not good. Just make sure that you put on enough epoxy to make the cloth just saturated.
5. Put on the glass cloth. Now don't make the mistake i did and use to little epoxy. The glass cloth has to be "wet".
6. Let it cure for a day or two before you try to remove it from the plug.
And even after removing it from the plug, put it back on as much as possible to make sure that it don't become twisted or deformed before it's completely cured.
7. Sandpaper...A few hours work later and you have perfect finish..
 Here is the boat on the scale. I don't remember the weight but this was the first hull so it was too light. This is before the kevlar reinforcements.
To get the right strength at some critical points i put 60gr kevlar cloth round the flange, along the waterline, in the center of the boat round the finbox and at the rear where the rudder axle will be mounted. That was done after separating the hull from the plug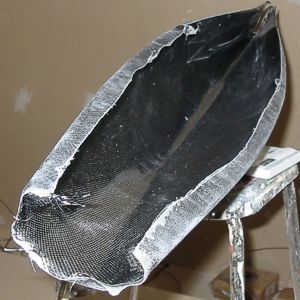
To make the deck in one moulding, i have made a "deck-plug" It's the whole deck from the bow back to the mounting of the rudderservo.
More on the hull and moulding the deck
 After sanding and some more sanding on the outside of the hull (still on the plug) i varnished it with my floor-varnish to get a nice and shiny finish. Then it was time for some kevlar-reinforcements and putting the finbox, ruddertube and mountings for the rudderservo in place.
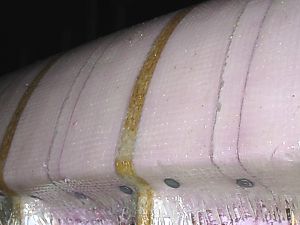
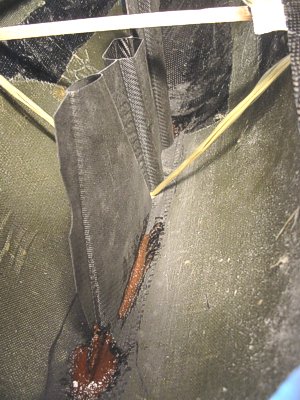
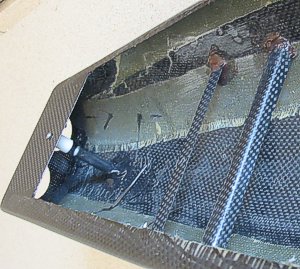
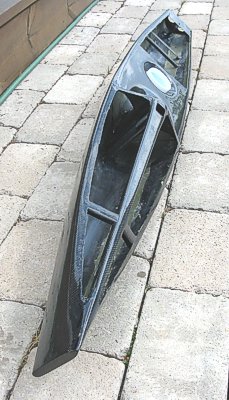
The reinforcements is made from 60gr kevlar cloth and as you can se from these pictures theye are located round the flange, at the waterline and round the finbox area. Not very complicated to put them there using epoxy. Just make sure you have sanded away all the wax and release agent from the plug. I use acetone to clean it after sanding.
The finbox is glued in place using epoxy and filleting blend (some kind of fibers with a natural wood color, leftover from my wooden boat days) to get the right consistency on the epoxy. On the picture to the right (disregard the white thing on top, it's a balsa stick there to keep the hull at the right beam) i haven't glued it in place "permanently" to make it possible to remove if i didn't get it completely right. Fortunatly i did so next step was to mix epoxy, filleting blend and black color pigment to get a black mix and make a rounded joint round the whole finbox. To get it round and smooth i use the stick from an ice cream (well in Sweden they have rounded ends..)
The best trick to get the finbox in exactly the right position is probably not to just take a measurment from the drawing and then use eyesight to get it aligned. But that's how i did it and it worked for me...
 The yellow lines coming out from the bottom is kevlar threads glued on the flange at the position of the eyebolts for the shrouds on the c and c2 rigs, to get a stiffer boat. I have seen boats with rigging screws in that position, and that should work too. My old boat is very stiff with this kevlar-variant.
The rear deck and the stern is made from pieces of epoxy and carbonfiber laminated (2-3 layers) on a piece of thick windowglass (well probably not made for windows since it's about 5mm thick, but you get it..) and cut with a normal pair of scissors to the right size. By laminating on glass you get a perfect finish on one side.
The ruddertube is carbon tube and the white bearing is ptfe, both from Sails Etc. The rubbertube goes right through the hull and is glued with my black epoxy mix. Then the ruddertube is cut to make a neat finish along the hull.
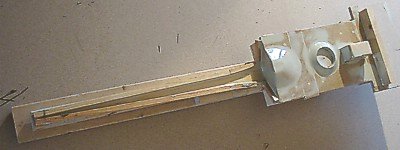
The mountings for the rudderservo is a beam cut in half. I made it for my first boat but never used it and it was good to have it lying around almost ten years later. 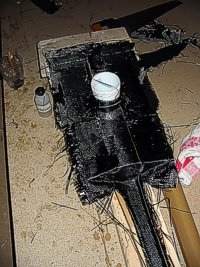
The deck
To get a strong but light deck i wanted to make it in one piece. I made a deck "plug", or rather a mould since the visible side would be the smooth one. The deck mould contains the mastrecess, radiopot recess and a mounting for the rudderservo. But as you have seen i choosed not to use it. It wasn't stiff enough and weighed far more than the solution you have seen above.
The deck plug was made out of wood (some of it balsa), chipboad and plastic padding. coated with floor varnish, waxed and coated with release agent. Ready for moulding..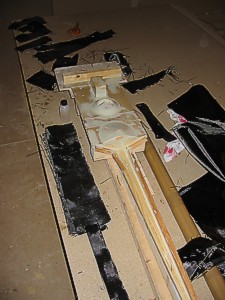
{mosimage}All carbon fiber that was going to be used cut up before moulding the deck. The small bottle to the left is the release agent. I didn't use any glass cloth for the deck since the surface would be smooth anyway.
Another messy moulding is finished...
Most of the deck is 2 layers of cloth but at some points it's three layers.
Just as with the hull i did this twice. The first moulding had too little carbon at some places and cavities in where i had use too little epoxy.
But the second try is usually better so i did it again. This time i suspect i used just too little hardener so the mould wouldn't cure as quickly as i wished it to. Had to be patient and use some heat to help it.
A couple of days later it was cured enough and i decided to use it, and not do it again...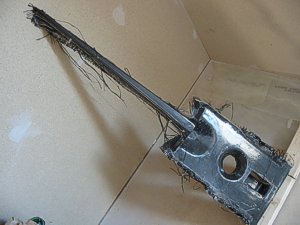
The raw deck moulding right of the mould. Just some cutting and sanding and filling and sanding before it can be fitted to the hull.
Putting it all together and the weight
After all the moulding and sanding and filling it was time to make a boat out of all the parts. Not too many pictures from putting it all together i'm afraid. Very busy making the deadline and working some nights made me forget the camera for a while.
To get the deck fitted on the the hull i cut it to fit inside the flange and moulded it in place with strips of carbon fiber on the underside. The fit wasn't perfect but i used my "black-filler" to make up for that. It's Plastic padding mixed with color pigments and a drop or two of acetone to make it easier to mix.
I used that black filler on quite a few places. The whole project was accelerated a bit in the last two weeks because of the upcoming Swedish National championships. So i didn't have time to make everything as perfect as a wanted.
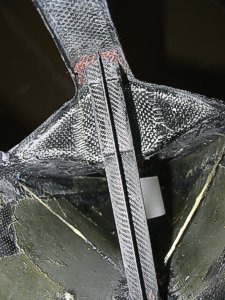
 This is the finbox and the deck from inside the boat. The red stuff on top of the masthole is epoxy and filleting blend not mixed with black color pigments.
The "cross" on the forward part of the deck beam is made from part of the old beam that was used to make the rudderservo mountings.
The bow is made from balsa wood and glued in place with the black "epoxyblend" mentioned in earlier parts. I made it from quite a thick balsa wood piece so that i could cut of a piece if the boat was a tad too long (wich it was..)
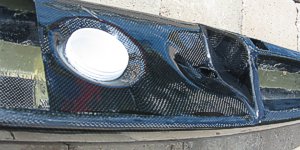 <-- Here is the middle part of the deck with mast recess and radio pot recess. The srew top pot for the radio is from Sails Etc and cost you only 1 pound and weighs only 23 grams.
Nice and shiny just before float testing in the pool.
This nice finish is now replaced with a sanded finish to get a
smooth and faster finish.
 And here it floats for the first time. Right on the marks. As you can se on the weight table below it weighs just as Graham wants it to (i put in extra weights here to make it weigh as much as it would with all equipment).
Weight.
Now i can sum up what the total weight will be.
The drawing says it should weigh 5200 grams with a ballast of 3700 grams. I got there with fin and ballast of 4000 grams. After sailing the boat i think i will take away 150-200 grams from the ballast. We are sailing in predominantly light weather so good speed in light winds is essential. And my experience from seeing other boats made lighter, i will not loose to much in higher wind speeds.
| Part | Weight in grams |
| Hull+deck+fittings | 540 |
| Rudder | 30 |
| Rudder servo | 40 |
| Winch | 140 |
| Battery pack | 80 |
| Radio screw pot | 25 |
| Reciever+antenna | 30 |
| A-rig | 320 |
| Fin and ballast | 4000 |
| Total | 5205 |
Sailing the boat
 Update 2005-01-21:
I lightened the boat this autumn, 400 grams was removed from the bulb. Floats i little lighter and no significant loss of stability has been noted.
When i write this i have competed two times with the boat. In the Swedish National Championships (SM) and in the Nordic Championships (NM). I have learned a few lessons about how the monarch handles and have some modifications and additions coming up.
The first race was SM in Landskrona just days after i (thought) i was finished with the boat and had all the fittings in place. Wich i did not. I forgot the eyebolt for the jibsheet. I did test the boat a few days before SM with the A-rig. The first race at SM was with the c-rig. The eyebolt problem was solved, and after getting the balance right i won the first race quite easily
As the wind calmed down the c-rig was replaced with b- or a-rig. And i didn't have the same speed with those rigs. Especially the b-rig was tricky to get right. Maybe just me not being used to it, but i am planning to replace it with a conventional rig instead of the swing-rig. I finished fourth at SM.
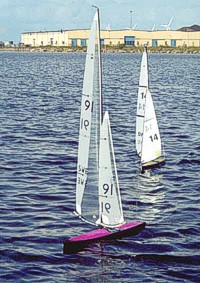
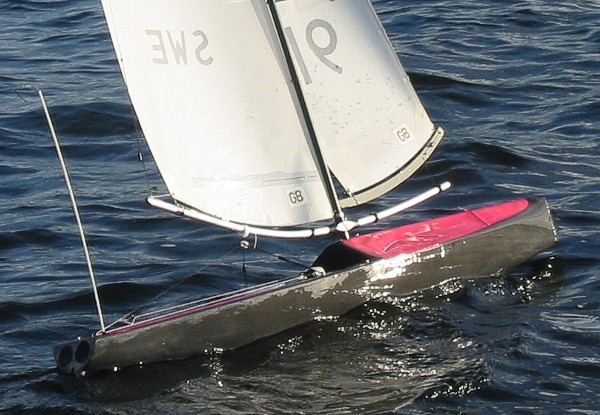 This could be the first picture of my Monarch.
Taken at SM by Erland Holmström.
Behind me is the, otherwise, nice guy Patrik Forsgren
who stole my bronce-medal ;-)
Then it was time for a summerbreak and getting up to speed with decorating the upper floor again. I didn't touch the boat for two months and then it was time for the Nordic Championships (NM).
Since i was the main organizer of the Nordics i had no time to do anything, i just charged the batteries and put the boat in the water and sailed. I should have done something about the less than smooth bulb and the rudder wich wasnt perfectly aligned with the fin (rushed it a bit when mounting the stock to the rudder).
It was a-rig the whole weekend in less than perfect sailing conditions with the winds coming from the land. Rarely from the same direction for more than a few seconds.
I finished, a bit surprised, a clear second at the Nordics. Mainly because i kept myself in the middle of the a-heat with a few firsts (and two b-heats wich could be discarded in the total points) and the rest of the field went up and down between a and b heats like they didnt really want to challenge Torvald who won clearly. Maybe sailing at my old homewater helped me understand the strange winds of lake Mälaren. The way the winds where i had no way of getting useful experince of the boats relative speed.
Maybe it felt a little heavy sometimes. I am planning to make a new longer bulb, a few hundred grams lighter than the current one that weighs (with fin) 4000 grams.
| Current rigs: | |
| A | Sails Etc swing with lightweight sails |
| B | Sails Etc swing with drawing film (?) sails |
| C | Walicki rig with M-racing mylar/kevlar sails |
| C2 | Walicki rig with M-racing mylar/kevlar sails |
Future plans for the rigs is to replace the b-rig with a Walicki or Sails Etc conventional rig and to make a C3 "storm" rig.
A new bulb will be made during the winter and a new rudder too. The one i'm using right no is as mentioned earlier, not perfect. I could buy the bulb from Sails Etc, its only 26 pounds, but i have to check the postage and packing fee for 3,6 kilos of lead...
What have i learned form making the Monarch? It's a damn good boat well worth making. Just make someonelse make the plug..
My inexperience in that filed made that part the hardest. If i would make another plug i would probably do it in a similar way, maybe with better precision when cutting the sections and replacing the plastic foam with a similar material made for industrial modelmaking.
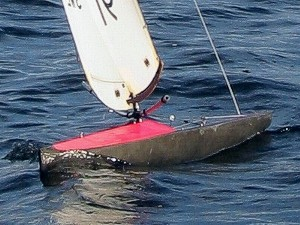 B-rig in choppy waters.
One of the biggest improvements compared to the old Wafer is the way it copes with waves.
 If anyone is interested in making a Monarch from my plug i am willing to assist and guide you, but the plug is not for sale and i will not give it away. Contact me and buy a drawing from Sails Etc so we have the license fee covered and i will be pleased to see that we have another fast Marblehead in the Swedish waters in a couple of months.
Thats it folks..se you on the water!

