

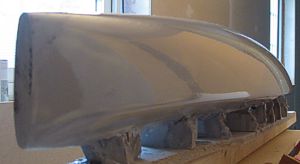
Moulding the hull
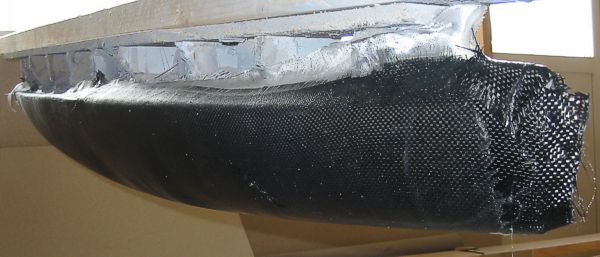
Time to mould the hull with epoxy, carbon fiber and glass cloth. Well i did it twice actually. The first time i used to little epoxy in the outer layer, wich gave a lot of small holes (pores) that had to be sealed. I tried with various things but wasn't satisfied, so i did it again. This time it's much better.
 I bought the carbonfiber cloth from Sails etc since i didn't know of any swedish company selling carbon fiber cloth at a reasonable price. I do now (its on SRSS links page). The hull is moulded with one layer of 200gr carbon cloth and one outer layer of 100gr glass cloth. That layer will mainly be there to keep the carbon cloth in place while curing and make sure there are no pores in the carbon cloth that will make the hull leak. Well it will leak anyway if you do as i did the first time :-/. The outer glass layer will almost entirely be sanded away and the end result will look loke pure carbon fibre (finished of with floor varnish offcourse :).
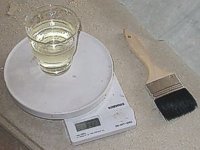 To get the epoxy right i always use a a digital scale. By measuring the two parts to the gram it always cures like it should.
 To make the hull to easily separate from the plug i waxed it thoroughly and used polyvinylalcohol (release agent). No problems in getting the hull too loosen, but a little help with an old dinghy batten made it even easier.
The order of work when moulding is something like this:
1. Cut the cloths in roughly the right sizes. You don't want to use the scissors to much when your hands are full of epoxy resin.
2. If you need to secure the cloth to the plug in anyway with nails or staples (you do if the cloth is so stiff that it wont bend round the flange, for example) take them out now and put them close to where you are working.
3. Mix the epoxy. Don't mix to much at the same time. It could start a chemical reaction that produces heat and the epoxy will harden to fast or even cause fire (i have been close). If you need more, make a second mixture later.
4. Lay the carbon cloth over the plug and "paint" the epoxy on the cloth. Don't paint the plug with epoxy an then lay the carbon over that. You will get an excessive amount of epoxy on the inside, and that's not good. Just make sure that you put on enough epoxy to make the cloth just saturated.
5. Put on the glass cloth. Now don't make the mistake i did and use to little epoxy. The glass cloth has to be "wet".
6. Let it cure for a day or two before you try to remove it from the plug.
And even after removing it from the plug, put it back on as much as possible to make sure that it don't become twisted or deformed before it's completely cured.
7. Sandpaper...A few hours work later and you have perfect finish..
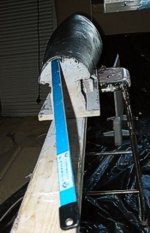 Here is the boat on the scale. I don't remember the weight but this was the first hull so it was too light. This is before the kevlar reinforcements.
To get the right strength at some critical points i put 60gr kevlar cloth round the flange, along the waterline, in the center of the boat round the finbox and at the rear where the rudder axle will be mounted. That was done after separating the hull from the plug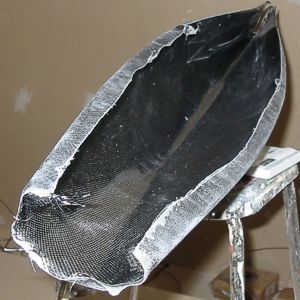
To make the deck in one moulding, i have made a "deck-plug" It's the whole deck from the bow back to the mounting of the rudderservo.

